
What is a Text widget in Flutter
In Flutter, the Text widget is used to display a short piece of text. It is a single line of non-editable text that is designed to be lightweight and efficient, allowing you to display text in your Flutter app quickly and easily. The Text widget has a number of helpful properties that you can use to customize the appearance and behaviour of the text it displays, such as the font, color, and textAlign properties.
How to use a Text widget in Flutter
To use a Text widget in Flutter, you can simply create an instance of the Text class and pass it the text that you want to display. Here is an example:
Text(
 'flutterassets.com',
),
This will display the text “flutterassets.com” using the default text style. You can customize the appearance of the text by passing in a TextStyle object to the style property of the Text widget. For example:
Text(
  'Hello World',
  style: TextStyle(fontSize: 32, color: Colors.red),
),
This will display the text “Hello World” with a font size of 32 and a colour of red.
Text.rich(
  TextSpan(
    children: [
      TextSpan(text: 'Hello', style: TextStyle(fontWeight: FontWeight.bold)),
      TextSpan(text: ' World'),
    ],
  ),
)
This will display the text “Hello World” with the word “Hello” in bold.
How to break a Text / String into multiple lines in Flutter
To break a Text or String into multiple lines in Flutter, you can use the \n character in the text string to indicate where you want to insert a line break.
The \n character is a newline character that is used to indicate the end of a line of text. When this character is encountered in a string, it creates a line break, causing the text that follows to be displayed on a new line.
For example, consider the following string:
'This is the first line.\nThis is the second line.'When this string is displayed, it will appear as follows:
This is the first line.
This is the second line.
The \n character is commonly used in programming to format text for display, such as in console output or in the user interface of an application. It is supported by most programming languages and text-based file formats.
Note that the \n character is a special character that must be escaped when used in a string literal. For example, you would need to use 'This is the first line.\\nThis is the second line.' if you want to include a literal \n character in a string.
If you want to add a break line you can use two \n\n as in the example below.
Text(
 "flutterassets.com\n\nProgramming isn't about what you know;\nIt's about what you can figure out.\n\n - Chris Pine",
),
If you have a long string and want to break it in the editor you can use quotation marks as in the example below.
        Text(
          "flutterassets.com"
              "\n\nProgramming isn't about what you know;"
              "\nIt's about what you can figure out."
              "\n\n - Chris Pine",
        ),
As you can see I used a double quotation (” “) to wrap the String but you can use a single quotation (‘ ‘) too.
There is a reason why I used a double quotation. The String itself contains words like “isn’t” and “it’s” which use a single quotation that could end the string and cause an error.
How to use special characters in Flutter
In Flutter, you can use special characters in strings by preceding them with a backslash (\) and their corresponding escape code.
To display a single quote character ('), you can use the following code:
Text('I\'m a Flutter developer') Text(
'Is\'t and are\'t are the examples',
),To display a double quote character (“), you can use the following code:
Text(
  '\"This is a quote\"',
),
You can also use Unicode code points to display special characters in Flutter. To do this, you can use the \u escape sequence followed by the four-digit hexadecimal code point of the character. For example:
Text('I \u2665 Flutter')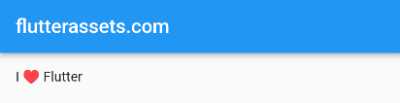
This will display the text “I ♥ Flutter”.
Note that when using escape sequences in a string literal, you may need to use additional backslashes to escape the backslashes themselves. For example:
Text('This is a backslash: \\\\')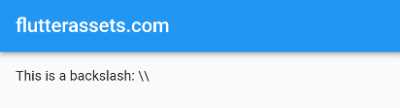
This will display the text “This is a backslash: \\”.
How to use a raw string in the Text widget in Flutter
In Flutter, you can use a raw string to display text that includes special characters or escape sequences in the Text widget. To create a raw string, you can use triple quotes (''') to enclose the string.
For example, consider the following string:
'This is a very long piece of text that needs to be wrapped into multiple lines.\nThis is the second line.'If you want to display this string in a Text widget, you will need to use escape sequences to indicate the newline character (\n). However, if you use a raw string, you can include the newline character directly in the string without using escape sequences. Here is an example of how you can use a raw string to display the text above:
Text('''
This is a very long piece of text that needs to be wrapped into multiple lines.
This is the second line.
''')
This will display the text “This is a very long piece of text that needs to be wrapped into multiple lines.” and “This is the second line.” on separate lines.
Raw strings are useful when you want to include special characters or escape sequences in your text without having to worry about using escape sequences. They can make your code more readable and easier to write, especially when working with long pieces of text.
In Flutter, you can use a raw string to display text that includes special characters or escape sequences in the Text widget. To create a raw string, you can use the r symbol followed by a pair of single quotes (r'') to enclose the string.
For example, consider the following string:
'This is a very long piece of text that needs to be wrapped into multiple lines.\nThis is the second line.'If you want to display this string in a Text widget, you will need to use escape sequences to indicate the newline character (\n). However, if you use a raw string, you can include the newline character directly in the string without using escape sequences. Here is an example of how you can use a raw string to display the text above:
Text(r'This is a very long piece of text that needs to be wrapped into multiple lines.\nThis is the second line.')Here is another example:
        Text(
          r"flutterassets.com \n raw string example.",
        ),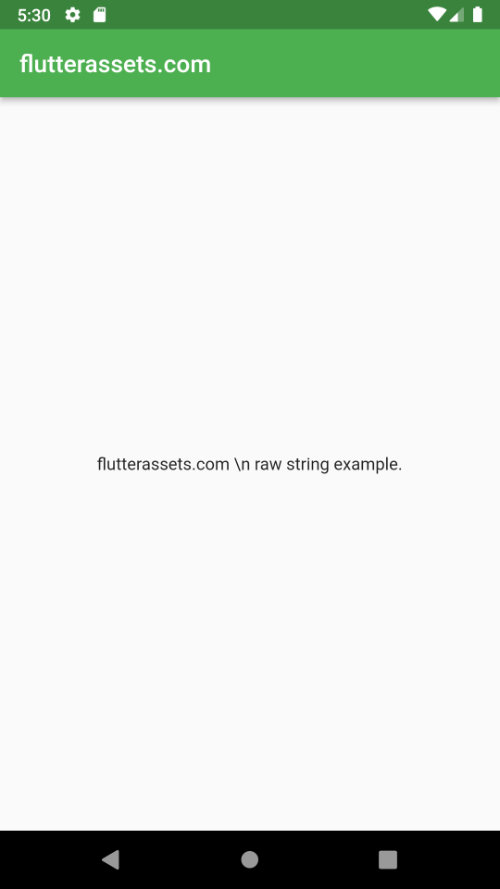
As you can see the string isn’t divided into two lines.
Raw strings are useful when you want to include special characters or escape sequences in your text without having to worry about using escape sequences. They can make your code more readable and easier to write, especially when working with long pieces of text.
Note that the r symbol must be placed before the quotes that enclose the string. If it is placed after the quotes, it will not create a raw string and the escape sequences will be interpreted as normal. For example:
Text('This is a very long piece of text that needs to be wrapped into multiple lines.\nThis is the second line.'r) // IncorrectThis will not create a raw string and the \n escape sequence will be interpreted as a newline character. To create a raw string, the r symbol must be placed before the quotes:
Text(r'This is a very long piece of text that needs to be wrapped into multiple lines.\nThis is the second line.') // CorrectHow to style text in Flutter
In Flutter, you can style text using the TextStyle class. The TextStyle class has a number of properties that you can use to customize the appearance of text, such as the fontSize, color, and fontWeight.
How to change font size in Flutter
To change the font size of the text in Flutter, you can use the fontSize property of the TextStyle class.
Here is an example of how you can use the fontSize property to change the font size of a Text widget:
        Text(
          'flutterassets.com',
          style: TextStyle(
            fontSize: 30
          )
        ),
How to make bold text in Flutter
To make bold text in Flutter, you can use the Text widget and set the style property to a TextStyle object with the fontWeight set to FontWeight.bold.
Here’s an example:
Text(
  'This is bold text',
  style: TextStyle(fontWeight: FontWeight.bold),
),
Or you can use FontWeight.w900:
            Text(
              'flutterassets.com',
              style: TextStyle(
                fontSize: 30,
                fontWeight: FontWeight.w900
              ),
            ),
See the screenshot below.
How to use fontWeight in Flutter
fontWeight is a property of the TextStyle class in Flutter. It specifies the font weight to use when rendering text. The fontWeight property can be set to one of the following values:
FontWeight.w100FontWeight.w200FontWeight.w300FontWeight.w400(normal)FontWeight.w500FontWeight.w600FontWeight.w700(bold)FontWeight.w800FontWeight.w900
Note that the fontWeight property only works if the font being used supports the specified weight. If the font does not support the weight, the text will be rendered using the closest available weight.
Here’s an example of how to use fontWeight in a Text widget:
Text(
  'This is bold text',
  style: TextStyle(fontWeight: FontWeight.bold),
),
Center(
child:
Column(
mainAxisAlignment: MainAxisAlignment.center,
children: [
Text(
'flutterassets.com',
style: TextStyle(
fontSize: 30,
fontWeight: FontWeight.w900
),
),
Text(
'flutterassets.com',
style: TextStyle(
fontSize: 30,
fontWeight: FontWeight.w400
),
),
Text(
'flutterassets.com',
style: TextStyle(
fontSize: 30,
fontWeight: FontWeight.w100
),
),
],
),
),
How to change font colour in Flutter
To change the font colour in Flutter, you can use the style property of the Text widget and set the color attribute. Here’s an example:
            Text(
              'flutterassets.com',
              style: TextStyle(
                fontSize: 30,
                fontWeight: FontWeight.w900,
                color: Colors.green
              ),
            ),
Use a colour value.
            Text(
              'flutterassets.com',
              style: TextStyle(
                fontSize: 30,
                fontWeight: FontWeight.w900,
                color: const Color(0xFF00FF00),
              ),
            ),
Color(0xFF00FF00) last 6 characters 00FF00 are the hex colour characters #00FF00. The first two FF characters are the alpha values where 00 means fully transparent and FF means fully opaque.
How to use a colour shade in Flutter
In Flutter, the shade method is used to get a lighter or darker shade of a colour. The shade method takes an integer as an argument, which determines the shade of the colour. A positive integer will give you a lighter shade of the colour, while a negative integer will give you a darker shade.
For example, if you want a slightly lighter shade of red, you can use Colors.red.shade100. If you want a much lighter shade, you can use Colors.red.shade600.
Here is a list of all the available shades for the default colours in Flutter:
shade50shade100shade200shade300shade400shade500shade600shade700shade800shade900
Keep in mind that the actual shades may vary depending on the colour.
      Center(
        child:
        Column(
          mainAxisAlignment: MainAxisAlignment.center,
          children: [
            Text(
              'flutterassets.com',
              style: TextStyle(fontSize: 30,fontWeight: FontWeight.w900,color: Colors.green.shade50
              ),
            ),
            Text(
              'flutterassets.com',
              style: TextStyle(fontSize: 30,fontWeight: FontWeight.w900,color: Colors.green.shade100
              ),
            ),
            Text(
              'flutterassets.com',
              style: TextStyle(fontSize: 30,fontWeight: FontWeight.w900,color: Colors.green.shade200
              ),
            ),
            Text(
              'flutterassets.com',
              style: TextStyle(fontSize: 30,fontWeight: FontWeight.w900,color: Colors.green.shade300
              ),
            ),
            Text(
              'flutterassets.com',
              style: TextStyle(fontSize: 30,fontWeight: FontWeight.w900,color: Colors.green.shade400
              ),
            ),
            Text(
              'flutterassets.com',
              style: TextStyle(fontSize: 30,fontWeight: FontWeight.w900,color: Colors.green.shade500
              ),
            ),
            Text(
              'flutterassets.com',
              style: TextStyle(fontSize: 30,fontWeight: FontWeight.w900,color: Colors.green.shade600
              ),
            ),
            Text(
              'flutterassets.com',
              style: TextStyle(fontSize: 30,fontWeight: FontWeight.w900,color: Colors.green.shade700
              ),
            ),
            Text(
              'flutterassets.com',
              style: TextStyle(fontSize: 30,fontWeight: FontWeight.w900,color: Colors.green.shade700
              ),
            ),
            Text(
              'flutterassets.com',
              style: TextStyle(fontSize: 30,fontWeight: FontWeight.w900,color: Colors.green.shade900
              ),
            ),
          ],
        ),
      ),
How to use a custom font in Flutter
To use a custom font in Flutter, you will need to add the font file to your project and specify the font in your Flutter code. Here’s an example of how to do this using a Google font:
- First, add the font file to your Flutter project. You can download the font file from Google Fonts.
https://fonts.google.com/specimen/Orbitron?vfonly=true#standard-styles
- Create a directory called assets in your project and then another directory called fonts. Paste your fonts to the fonts directory.
- In your
pubspec.yamlfile, specify the font under thefontskey:
flutter:
  fonts:
    - family: <font family name>
      fonts:
        - asset: fonts/<font file>.ttf
In my example, the family name is “Orbitron”.
  fonts:
    - family: Orbitron

      fonts:
        - asset: assets/fonts/Orbitron-VariableFont_wght.ttf
Not all fonts support all the fontWeight. In the example, the font supports font-weight from 400 to 900.
- In your Flutter code, you can use the
Textwidget’sstyleproperty to specify the font family:
Text(
  'Hello World',
  style: TextStyle(fontFamily: '<font family name>'),
),
Center(
child:
Column(
mainAxisAlignment: MainAxisAlignment.center,
children: [
Text(
'flutterassets.com',
style: TextStyle(fontSize: 30, color: Colors.green,
fontFamily: "Orbitron",
fontWeight: FontWeight.w400,
),
),
Text(
'flutterassets.com',
style: TextStyle(fontSize: 30, color: Colors.green,
fontFamily: "Orbitron",
fontWeight: FontWeight.w500,
),
),
Text(
'flutterassets.com',
style: TextStyle(fontSize: 30, color: Colors.green,
fontFamily: "Orbitron",
fontWeight: FontWeight.w600,
),
),
Text(
'flutterassets.com',
style: TextStyle(fontSize: 30, color: Colors.green,
fontFamily: "Orbitron",
fontWeight: FontWeight.w700,
),
),
Text(
'flutterassets.com',
style: TextStyle(fontSize: 30, color: Colors.green,
fontFamily: "Orbitron",
fontWeight: FontWeight.w800,
),
),
Text(
'flutterassets.com',
style: TextStyle(fontSize: 30, color: Colors.green,
fontFamily: "Orbitron",
fontWeight: FontWeight.w900,
),
),
],
),
),
How to use multiple custom fonts in Flutter
To use multiple custom fonts in Flutter, you can specify multiple font families in the fonts list in your pubspec.yaml file. Here I used the fonts Orbitron and Genos.
Genos font was downloaded from here:
https://fonts.google.com/specimen/Genos?query=Robert+Leuschke&vfonly=true
flutter:
  fonts:
    - family: <font family name 1>
      fonts:
        - asset: fonts/<font file 1>.ttf
    - family: <font family name 2>
      fonts:
        - asset: fonts/<font file 2>.ttf
fonts:
- family: Orbitron
fonts:
- asset: assets/fonts/Orbitron-VariableFont_wght.ttf
- family: Genos
fonts:
- asset: assets/fonts/Genos-Thin.ttf
weight: 100
- asset: assets/fonts/Genos-ExtraLight.ttf
weight: 200
- asset: assets/fonts/Genos-light.ttf
weight: 300
- asset: assets/fonts/Genos-Regular.ttf
weight: 400
- asset: assets/fonts/Genos-Medium.ttf
weight: 500
- asset: assets/fonts/Genos-SemiBold.ttf
weight: 600
- asset: assets/fonts/Genos-Bold.ttf
weight: 700
- asset: assets/fonts/Genos-ExtraBold.ttf
weight: 800
- asset: assets/fonts/Genos-Black.ttf
weight: 900In your Flutter code, you can use the Text widget’s style property to specify the font family:
      Center(
        child:
        Column(
          mainAxisAlignment: MainAxisAlignment.center,
          children: const [
            Text(
              'flutterassets.com',
              style: TextStyle(fontSize: 30, color: Colors.green,
                fontFamily: "Orbitron",
                fontWeight: FontWeight.w100,
              ),
            ),
            Text(
              'flutterassets.com',
              style: TextStyle(fontSize: 30, color: Colors.green,
                fontFamily: "Genos",
                fontWeight: FontWeight.w200,
              ),
            ),
            Text(
              'flutterassets.com',
              style: TextStyle(fontSize: 30, color: Colors.green,
                fontFamily: "Genos",
                fontWeight: FontWeight.w300,
              ),
            ),
            Text(
              'flutterassets.com',
              style: TextStyle(fontSize: 30, color: Colors.green,
                fontFamily: "Genos",
                fontWeight: FontWeight.w400,
              ),
            ),
            Text(
              'flutterassets.com',
              style: TextStyle(fontSize: 30, color: Colors.green,
                fontFamily: "Genos",
                fontWeight: FontWeight.w500,
              ),
            ),
            Text(
              'flutterassets.com',
              style: TextStyle(fontSize: 30, color: Colors.green,
                fontFamily: "Genos",
                fontWeight: FontWeight.w600,
              ),
            ),
            Text(
              'flutterassets.com',
              style: TextStyle(fontSize: 30, color: Colors.green,
                fontFamily: "Genos",
                fontWeight: FontWeight.w700,
              ),
            ),
            Text(
              'flutterassets.com',
              style: TextStyle(fontSize: 30, color: Colors.green,
                fontFamily: "Genos",
                fontWeight: FontWeight.w800,
              ),
            ),
            Text(
              'flutterassets.com',
              style: TextStyle(fontSize: 30, color: Colors.green,
                fontFamily: "Genos",
                fontWeight: FontWeight.w900,
              ),
            ),
          ],
        ),
      ),
How to use a custom italic font in Flutter
As in the previous example, paste your fonts to your fonts directory and add them to your pubspec.yaml.
  fonts:
    - family: Genos
      fonts:
        - asset: assets/fonts/Genos-ThinItalic.ttf
          weight: 100
          style: italic
        - asset: assets/fonts/Genos-ExtraLightItalic.ttf
          weight: 200
          style: italic
        - asset: assets/fonts/Genos-lightItalic.ttf
          weight: 300
          style: italic
        - asset: assets/fonts/Genos-Italic.ttf
          weight: 400
          style: italic
        - asset: assets/fonts/Genos-MediumItalic.ttf
          weight: 500
          style: italic
        - asset: assets/fonts/Genos-SemiBoldItalic.ttf
          weight: 600
          style: italic
        - asset: assets/fonts/Genos-BoldItalic.ttf
          weight: 700
          style: italic
        - asset: assets/fonts/Genos-ExtraBoldItalic.ttf
          weight: 800
          style: italic
        - asset: assets/fonts/Genos-BlackItalic.ttf
          weight: 900
          style: italic
Now, you can use fontStyle: FontStyle.italic.
Please note, the font must support italic style.
      Center(
        child:
        Column(
          mainAxisAlignment: MainAxisAlignment.center,
          children: const [
            Text(
              'flutterassets.com',
              style: TextStyle(fontSize: 30, color: Colors.green,
                fontFamily: "Genos",
                fontWeight: FontWeight.w200,fontStyle: FontStyle.italic,
              ),
            ),
            Text(
              'flutterassets.com',
              style: TextStyle(fontSize: 30, color: Colors.green,
                fontFamily: "Genos",
                fontWeight: FontWeight.w300,fontStyle: FontStyle.italic,
              ),
            ),
            Text(
              'flutterassets.com',
              style: TextStyle(fontSize: 30, color: Colors.green,
                fontFamily: "Genos",
                fontWeight: FontWeight.w400,fontStyle: FontStyle.italic,
              ),
            ),
            Text(
              'flutterassets.com',
              style: TextStyle(fontSize: 30, color: Colors.green,
                fontFamily: "Genos",
                fontWeight: FontWeight.w500,fontStyle: FontStyle.italic,
              ),
            ),
            Text(
              'flutterassets.com',
              style: TextStyle(fontSize: 30, color: Colors.green,
                fontFamily: "Genos",
                fontWeight: FontWeight.w600,fontStyle: FontStyle.italic,
              ),
            ),
            Text(
              'flutterassets.com',
              style: TextStyle(fontSize: 30, color: Colors.green,
                fontFamily: "Genos",
                fontWeight: FontWeight.w700,fontStyle: FontStyle.italic,
              ),
            ),
            Text(
              'flutterassets.com',
              style: TextStyle(fontSize: 30, color: Colors.green,
                fontFamily: "Genos",
                fontWeight: FontWeight.w800,fontStyle: FontStyle.italic,
              ),
            ),
            Text(
              'flutterassets.com',
              style: TextStyle(fontSize: 30, color: Colors.green,
                fontFamily: "Genos",
                fontWeight: FontWeight.w900,fontStyle: FontStyle.italic,
              ),
            ),
          ],
        ),
      ),
How to underline Text in Flutter
To underline text in Flutter, you can use the Text widget’s style property and set the decoration attribute to TextDecoration.underline. Here’s an example:
Text(
  'Hello World',
  style: TextStyle(decoration: TextDecoration.underline),
),
Text(
'flutterassets.com',
style: TextStyle(fontSize: 30, color: Colors.green,
fontFamily: "Genos",
fontWeight: FontWeight.w900,
decoration: TextDecoration.underline,
),
),
How to use Text decoration in Flutter
To use text decoration in Flutter, you can use the Text widget’s style property and set the decoration attribute. The TextDecoration class has several values that you can use to decorate text, including underline, overline, and lineThrough.
Here’s an example of how to underline text:
Text(
  'Hello World',
  style: TextStyle(decoration: TextDecoration.underline),
),
How to use TextDecorationStyle in Flutter
To use the TextDecorationStyle class in Flutter, you can specify the style attribute in the decoration property of the Text widget’s style property. The TextDecorationStyle class has three values: solid, double, and dotted.
Here’s an example of how to use the TextDecorationStyle class to decorate text with a double underline:
            Text(
              'flutterassets.com',
              style: TextStyle(fontSize: 40, color: Colors.green,
                fontFamily: "Genos",
                fontWeight: FontWeight.w900,
                decoration: TextDecoration.underline,
                decorationColor: Colors.red,
                decorationThickness: 2,
                decorationStyle: TextDecorationStyle.dashed,
              ),
            ),


//decorationStyle: TextDecorationStyle.dashed,
//decorationStyle: TextDecorationStyle.dotted,
//decorationStyle: TextDecorationStyle.double,
//decorationStyle: TextDecorationStyle.wavy,
How to add shadow to Text in Flutter
To add a shadow to text in Flutter, you can use the Text widget’s style property and set the shadows attribute. The shadows attribute is a list of Shadow objects, which you can use to specify the shadow’s colour, offset, and blur radius.
Color.fromARGB(128, 0, 0, 0) mean colour from ARGB (Alpha Red Green Blue) where alpha 0 means transparent and 255 means opaque. Alpha value 128 is half transparent.
            Text(
              'flutterassets.com',
              style: TextStyle(fontSize: 40, color: Colors.green,
                fontFamily: "Genos",
                fontWeight: FontWeight.w900,
                shadows: [
                  Shadow(
                    color: Color.fromARGB(128, 0, 0, 0),
                    offset: Offset(10, 10),
                    blurRadius: 5,
                  )
                ],
              ),
            ),
How you can add multiple shadows to Text in Flutter
To add multiple shadows to text in Flutter, you can use the Text widget’s style property and set the shadows attribute to a list of Shadow objects.
Here’s an example of how to add multiple shadows to text:
Text(
  'flutterassets.com',
  style: TextStyle(fontSize: 40, color: Colors.green,
    fontFamily: "Genos",
    fontWeight: FontWeight.w900,
    shadows: [
      Shadow(
        color: Color.fromARGB(128, 0, 0, 0),
        offset: Offset(10, 10),
        blurRadius: 5,
      ),
      Shadow(
        color: Color.fromARGB(64, 0, 0, 0),
        offset: Offset(-10, -10),
        blurRadius: 10,
      ),
    ],
  ),
),
You can add as many shadows as you want to the shadows list. Each shadow will be drawn on top of the previous shadow.
Keep in mind that the order of the shadows in the list determines the order in which they are drawn. Shadows at the beginning of the list will be drawn behind shadows at the end of the list.
How to use multiple Text styles in Flutter
To use multiple text styles in Flutter, you can use the Text.rich widget and specify the styles for specific spans of text using a TextSpan widget.
You can specify any text style attributes that you want for each span of text, such as fontSize, fontWeight, color, etc.
Here’s an example of how to use multiple text styles with Text.rich:
            Text.rich(
              TextSpan(
                text: '\"',
                style: TextStyle(
                  fontSize: 30,
                  color: Colors.red,
                  fontFamily: "Orbitron",
                  fontWeight: FontWeight.w900,
                ),

                children: <TextSpan>[
                  TextSpan(
                      text: 'flutterassets.',
                      style: TextStyle(
                        color: Colors.green,
                        fontFamily: "Orbitron",
                        fontWeight: FontWeight.w900,
                      )
                  ),
                  TextSpan(
                      text: 'com',
                      style: TextStyle(
                        color: Colors.blue,
                        fontFamily: "Genos",
                        fontWeight: FontWeight.w900,
                        decoration: TextDecoration.underline,
                        decorationColor: Colors.red,
                        decorationStyle: TextDecorationStyle.dotted,
                      )
                  ),
                  TextSpan(
                    text: '\"',
                    style: TextStyle(
                      fontSize: 30,
                      color: Colors.red,
                      fontFamily: "Orbitron",
                      fontWeight: FontWeight.w900,
                    ),
                  ),
                ],
              ),
            ),
How to use RichText in Flutter
The RichText widget in Flutter is a widget that displays rich text, which is text that can have formatting such as bold, italic, and underline, as well as nested spans with different styles.
To use the RichText widget, you need to specify the rich text to display using a TextSpan widget. The TextSpan widget has a text property for the text to display, and a style property for the style to apply to the text. You can also specify a list of nested TextSpan widgets using the children property, which allows you to specify different styles for different spans of text within the same RichText widget.
Here’s an example of how to use the RichText widget:
RichText(
  text: TextSpan(
    text: 'Hello ',
    style: DefaultTextStyle.of(context).style.copyWith(fontSize: 32.0),
    children: <TextSpan>[
      TextSpan(text: 'World', style: TextStyle(fontWeight: FontWeight.bold, fontSize: 48.0)),
    ],
  ),
)
You can specify any text style attributes that you want for each span of text, such as fontSize, fontWeight, color, etc.
Here the result will be the same as in the above section.
            RichText(
              text: TextSpan(
                text: '\"',
                style: TextStyle(
                  fontSize: 30,
                  color: Colors.red,
                  fontFamily: "Orbitron",
                  fontWeight: FontWeight.w900,
                ),

                children: <TextSpan>[
                  TextSpan(
                      text: 'flutterassets.',
                      style: TextStyle(
                        color: Colors.green,
                        fontFamily: "Orbitron",
                        fontWeight: FontWeight.w900,
                      )
                  ),
                  TextSpan(
                      text: 'com',
                      style: TextStyle(
                        color: Colors.blue,
                        fontFamily: "Genos",
                        fontWeight: FontWeight.w900,
                        decoration: TextDecoration.underline,
                        decorationColor: Colors.red,
                        decorationStyle: TextDecorationStyle.dotted,
                      )
                  ),
                  TextSpan(
                    text: '\"',
                    style: TextStyle(
                      fontSize: 30,
                      color: Colors.red,
                      fontFamily: "Orbitron",
                      fontWeight: FontWeight.w900,
                    ),
                  ),
                ],
              ),
            ),
How to make text selectable in Flutter
To make text selectable in Flutter, you can use the SelectableText widget. The SelectableText widget is a text widget that allows the user to select and copy the text.
To use the SelectableText widget, you need to specify the text to display using the text property, and you can also specify the style of the text using the style property.
Here’s an example of how to use the SelectableText widget:
            SelectableText(
              'flutterassets.com',
              style: TextStyle(fontSize: 40, color: Colors.green,
                fontFamily: "Genos",
                fontWeight: FontWeight.w900,
              ),
            ),
You can also use rich with SelectableText.
            SelectableText.rich(
              TextSpan(
                text: 'flutterassets',
                style: TextStyle(
                  fontSize: 30,
                  color: Colors.green,
                  fontFamily: "Genos",
                  fontWeight: FontWeight.w900,
                ),

                children: <TextSpan>[

                  TextSpan(text: '.com', style: TextStyle(
                      fontStyle: FontStyle.italic,fontSize: 50, color: Colors.blue)),

                  TextSpan(text: ' :)', style: TextStyle(
                      fontWeight: FontWeight.bold, color: Colors.red)),
                ],
              ),
            ),
How to add the colour gradient to the Text in Flutter
To add a color gradient to text in Flutter, you can use the ShaderMask widget and specify a gradient shader using the shader property.
Here’s an example of how to use the ShaderMask widget to add a gradient to text:
ShaderMask(
  blendMode: BlendMode.srcIn,
  shaderCallback: (bounds) => LinearGradient(colors: [
    Colors.red,
    Colors.indigo,
    ]).createShader(
    Rect.fromLTWH(0, 0, bounds.width, bounds.height),
  ),
  child: Text('Hello World', style: TextStyle(fontSize: 32.0),),
)
This will render the text “Hello World” in a font size of 32, and the text will have a gradient that goes from yellow to red, starting from the top left corner and ending at the bottom right corner.
You can specify any gradient that you want using the LinearGradient class. The LinearGradient class has a colors property for the colours to use in the gradient, and a begin and end property for the start and end points of the gradient.
You can read more about colour gradients in this post: How do you add a gradient background color in Flutter?
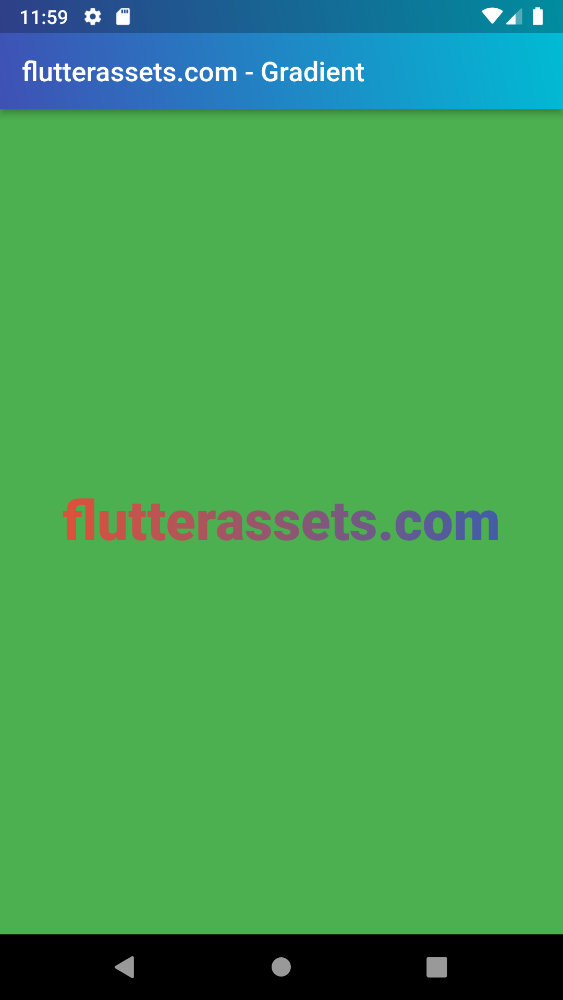
Create a custom GradientText widget in Flutter
To create a custom GradientText widget in Flutter, you can create a new class that extends the StatelessWidget class and use the ShaderMask widget to apply a gradient to the text.
Here’s an example of how to create a custom GradientText widget:
class GradientText extends StatelessWidget {
  const GradientText(
      this.text, {
        required this.gradient,
        this.style,
      });

  final String text;
  final TextStyle? style;
  final Gradient gradient;

  @override
  Widget build(BuildContext context) {
    return ShaderMask(
      blendMode: BlendMode.srcIn,
      shaderCallback: (bounds) => gradient.createShader(
        Rect.fromLTWH(0, 0, bounds.width, bounds.height),
      ),
      child: Text(text, style: style),
    );
  }
}
You can use the GradientText widget like any other widget:
      body: Center(
        child: Container(
            height: MediaQuery.of(context).size.height,
            width: MediaQuery.of(context).size.width,
          color: Colors.green,
          alignment: Alignment.center,
          child: GradientText(
            'flutterassets.com',
            style: const TextStyle(fontSize: 40, fontWeight: FontWeight.w900),
            gradient: LinearGradient(colors: [
              Colors.red,
              Colors.indigo,
            ]),
          ),
        ),
      ),
How to use Text Ellipsis / Overflow in Flutter
To use text ellipsis (…) to indicate text overflow in Flutter, you can use the Text widget’s overflow property and set it to TextOverflow.ellipsis.
Here’s an example of how to use text ellipsis:
Text(
  'Lorem ipsum dolor sit amet, consectetur adipiscing elit, sed do eiusmod tempor incididunt ut labore et dolore magna aliqua.',
  maxLines: 1,
  overflow: TextOverflow.ellipsis,
)
This will render the text “Lorem ipsum dolor sit amet, consectetur adipiscing elit, sed do eiusmod tempor incididunt ut labore et dolore magna aliqua.” with a maximum of one line, and the text will be truncated with an ellipsis (…) if it doesn’t fit within the available space.
In the example below I used:
- TextOverflow.clip
- TextOverflow.fade
- TextOverflow.ellipsis
- TextOverflow.visible
      Center(
        child:
        Column(
          mainAxisAlignment: MainAxisAlignment.center,
          children: [
            Container(
              padding: const EdgeInsets.all(20.0),
              color: Colors.grey.shade200,
              width: 300,
              child: const Text(
                'flutterassets.com',
                maxLines: 1,
                overflow: TextOverflow.clip,
                softWrap: false,
                style: TextStyle(
                  fontSize: 40,
                  color: Colors.green,
                  fontFamily: "Genos",
                  fontWeight: FontWeight.w900,
                ),
              ),
            ),
            Container(
              padding: const EdgeInsets.all(20.0),
              color: Colors.grey.shade200,
              width: 300,
              child: const Text(
                'flutterassets.com',
                maxLines: 1,
                overflow: TextOverflow.fade,
                softWrap: false,
                style: TextStyle(
                  fontSize: 40,
                  color: Colors.green,
                  fontFamily: "Genos",
                  fontWeight: FontWeight.w900,
                ),
              ),
            ),
            Container(
              padding: const EdgeInsets.all(20.0),
              color: Colors.grey.shade200,
              width: 300,
              child: const Text(
                'flutterassets.com',
                maxLines: 1,
                overflow: TextOverflow.ellipsis,
                softWrap: false,
                style: TextStyle(
                  fontSize: 40,
                  color: Colors.green,
                  fontFamily: "Genos",
                  fontWeight: FontWeight.w900,
                ),
              ),
            ),
            Container(
              padding: const EdgeInsets.all(20.0),
              color: Colors.grey.shade200,
              width: 300,
              child: const Text(
                'flutterassets.com',
                maxLines: 1,
                overflow: TextOverflow.visible,
                softWrap: false,
                style: TextStyle(
                  fontSize: 40,
                  color: Colors.green,
                  fontFamily: "Genos",
                  fontWeight: FontWeight.w900,
                ),
              ),
            ),
          ],
        ),
      ),
How to fix Row RenderFlex overflowed by … pixels in Flutter
 //Error code
           Row(
              children: const [
                Text(
                  'flutterassets.com',
                  maxLines: 1,
                  overflow: TextOverflow.fade,
                  softWrap: false,
                  style: TextStyle(
                    fontSize: 50,
                    color: Colors.green,
                    fontFamily: "Genos",
                    fontWeight: FontWeight.w900,
                  ),
                ),
              ],
            ),
The following assertion was thrown during layout:
A RenderFlex overflowed by 15 pixels on the right.
To fix this error simply wrap Text into Flexible or Expended
            Row(
              children: const [
                Flexible(
                  child: Text(
                    'flutterassets.com',
                    maxLines: 1,
                    overflow: TextOverflow.fade,
                    softWrap: false,
                    style: TextStyle(
                      fontSize: 50,
                      color: Colors.green,
                      fontFamily: "Genos",
                      fontWeight: FontWeight.w900,
                    ),
                  ),
                ),
              ],
            ),
Expanded(
child: Text(
'flutterassets.com',
maxLines: 1,
overflow: TextOverflow.fade,
softWrap: false,
style: TextStyle(
fontSize: 50,
color: Colors.green,
fontFamily: "Genos",
fontWeight: FontWeight.w900,
),
),
),
Another example with Row, Text, and Icons.
You can read more about Icons in this post: Flutter Basics – How to use Icons in Flutter
            Row(
              children: [
                Container(
                    padding: const EdgeInsets.all(10.0),
                    child: Icon(Icons.favorite, color: Colors.red, size: 40,)
                ),
                const Expanded(
                  child: Text(
                    'flutterassets.com',
                    overflow: TextOverflow.fade,
                    softWrap: false,
                    style: TextStyle(
                      fontSize: 40,
                      color: Colors.green,
                      fontFamily: "Genos",
                      fontWeight: FontWeight.w900,
                    ),
                  ),
                ),
                Container(
                    padding: const EdgeInsets.all(10.0),
                    child: Icon(Icons.favorite, color: Colors.red, size: 40,)
                ),
              ],
            ),
How to make Text Scrollable in Flutter
To make text scrollable in Flutter, you can use the SingleChildScrollView widget and wrap the Text widget in it. You can also specify the scroll direction using the SingleChildScrollView widget’s scrollDirection property, which can be either Axis.horizontal or Axis.vertical.
            const SingleChildScrollView(
              scrollDirection: Axis.horizontal,
              child: Text(
                'flutterassets.com',
                style: TextStyle(
                  fontSize: 60,
                  color: Colors.green,
                  fontFamily: "Genos",
                  fontWeight: FontWeight.w900,
                ),
              ),
            ),
How to make Text Scrollable inside Row in Flutter
To make text scrollable inside a row in Flutter, you can use SingleChildScrollView inside the Row wrapped in Flexible or Expended.
            Row(
              children: [
                Container(
                    padding: const EdgeInsets.all(10.0),
                    child: Icon(Icons.favorite, color: Colors.red, size: 40,)
                ),
                const Flexible(
                  child: SingleChildScrollView(
                    scrollDirection: Axis.horizontal,
                    child: Text(
                      'flutterassets.com',
                      style: TextStyle(
                        fontSize: 40,
                        color: Colors.green,
                        fontFamily: "Genos",
                        fontWeight: FontWeight.w900,
                      ),
                    ),
                  ),
                ),
                Container(
                    padding: const EdgeInsets.all(10.0),
                    child: Icon(Icons.favorite, color: Colors.red, size: 40,)
                ),
              ],
            ),